How to Use OBS Studio: Complete Beginner's Guide to Live Streaming (2026)
A step-by-step guide to setting up OBS Studio for live streaming and recording, including scenes, sources, and optimal settings for 2026.
• Start with the wizard (OBS 32.1, 2026): Always use the Auto-Configuration Wizard first to optimize settings for your hardware.
• Scenes vs Sources: Scenes are your overall screen layouts; sources are the individual elements (webcam, microphone, screen capture) inside them.
• Record locally: For business and marketing videos, record your stream locally in MKV format, then upload it to a dedicated video host.
OBS Studio (Open Broadcaster Software) is the gold standard for live streaming and screen recording. It is entirely free, open-source, and packed with professional features, but it is also famous for having a steep learning curve.
Jumping straight into OBS without understanding its core concepts usually leads to black screens, silent audio, or dropped frames. In our experience working with video delivery, taking five minutes to understand how OBS handles inputs saves hours of troubleshooting later.
Updated for OBS Studio 32.1 (2026), this guide walks you through setting up OBS Studio from scratch, configuring your first layout, and going live on platforms like YouTube or Twitch.
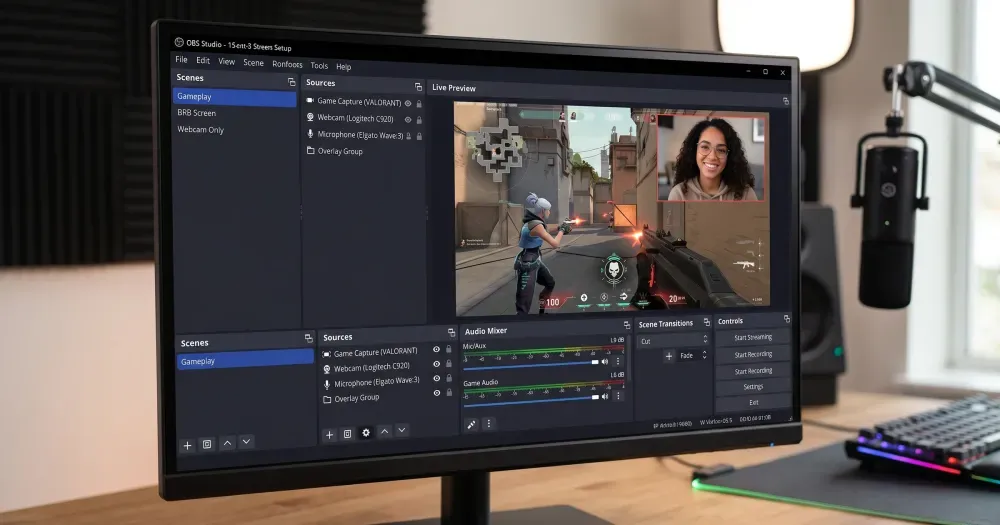
What are scenes and sources in OBS?
Before you touch any settings, you need to understand the difference between scenes and sources. This is the number one confusion point we see for beginners.
Think of a Scene as a stage in a theater. You might have one scene called "Full Screen Game" and another called "Just Chatting."
Sources are the actors and props on that stage. Your microphone, your webcam, your desktop display, and any text overlays are all sources. You add sources into a scene to build your layout.
Step 1: Download and Run the Auto-Configuration Wizard
First, download OBS Studio from the official obsproject.com website. It is available for Windows, Mac, and Linux. As of OBS Studio 32.1 (released April 2026), OBS ships with a built-in Plugin Manager, a reworked audio mixer, and WebRTC output, building on the 32.0 release that first added the Plugin Manager and Metal renderer support for Mac (OBS Project, 2026), making the current setup process smoother than earlier versions.
Once installed, do not manually tweak your settings right away. Instead, use the Auto-Configuration Wizard:
- Open OBS Studio.
- Click Tools in the top menu bar, then select Auto-Configuration Wizard.
- Choose whether you want to optimize for streaming or optimizing just for recording.
- Let the wizard test your hardware and internet connection to set your baseline resolution, frame rate, and bitrate.
Step 2: Adding Your First Sources
After the Auto-Configuration Wizard sets your baseline resolution, frame rate, and bitrate, the next step in OBS is to build your first scene.
By default, OBS creates an empty scene called "Scene." To make it visible to your audience, you need to add sources to it.
How do you add a display or game capture in OBS?
To show your screen or a game in an OBS scene:
- Look at the Sources dock at the bottom of the screen.
- Click the + (plus) button.
- Select Display Capture (to show your entire monitor) or Game Capture (to capture a specific full-screen application).
- Name the source and click OK.
How do you add your webcam to OBS?
To add your webcam feed to an OBS scene:
- Click the + button in the Sources dock again.
- Select Video Capture Device.
- Choose your webcam from the Device dropdown menu.
- Click OK. You can now click and drag your webcam feed to resize it and move it to a corner of the screen.
How do you set up audio in OBS?
In the Audio Mixer dock, you will see meters for your Desktop Audio and your Mic/Aux. If the green bars are moving when you talk or play audio on your computer, OBS is capturing sound. If not, click the gear icon next to a source, go to Properties, and ensure the correct microphone or headset is selected.
Step 3: How do you connect OBS to a streaming platform?
To broadcast a live stream, you need to link OBS to your chosen platform using a stream key. Think of a stream key as a secure password that tells OBS exactly where to send your video. Never share your stream key publicly.
How do you stream to YouTube with OBS?
- Go to YouTube Studio in your browser and click the Create icon, then Go live.
- In the YouTube Live Control Room, copy your Stream key.
- In OBS, click Settings in the bottom right corner, then navigate to the Stream tab.
- Set the Service to YouTube - RTMPS. You can learn more about what RTMP is here.
- Paste your key into the Stream Key field, click Apply, and then OK.
How do you stream to Twitch with OBS?
- Log in to your Twitch account and open the Creator Dashboard.
- Navigate to Settings > Stream.
- Copy the Primary Stream key.
- In OBS Settings > Stream, select Twitch as the service.
- You can either connect your Twitch account directly (which adds Twitch chat docks to OBS) or paste the stream key manually.
Once you've recorded a webinar or product demo with OBS, you need a reliable place to host it on your website. Uploading it to YouTube means risking competitor ads and suggested videos appearing on your landing pages. SmartVideo offers clean, ad-free video hosting designed to keep viewers focused on your content.
Step 4: What bitrate should you use in OBS?
Your video bitrate determines how much data OBS sends to the streaming platform per second. A higher bitrate means better quality, but it requires a faster internet upload speed.
If you set your bitrate higher than your internet connection can handle, your stream will buffer and drop frames. A generally recommended starting point for a 1080p 60fps stream is 4,500–6,000 kbps (Ant Media Server, 2026).
You can adjust this in OBS under Settings > Output. If you are experiencing connection drops, try lowering your bitrate slightly.
How can you use OBS for business and marketing?
While OBS Studio is best known in the gaming community, it is also well suited to business use, particularly for recording online courses, product demos, and webinars.
- The Virtual Camera: OBS includes a built-in Virtual Camera button. Clicking this turns your OBS output into a selectable webcam in Zoom, Google Meet, or Microsoft Teams. This allows you to use professional overlays, screen sharing, and multiple camera angles directly in business meetings.
- Recording locally: When recording content to edit and upload to video hosting platforms later, always record in MKV format (found in Settings > Output > Recording). If OBS crashes or your power goes out, an MKV file will save up to the moment of the crash, whereas an MP4 file will be completely corrupted (OBS Knowledge Base, 2026). OBS can easily remux (convert) the MKV to MP4 later through the File menu.
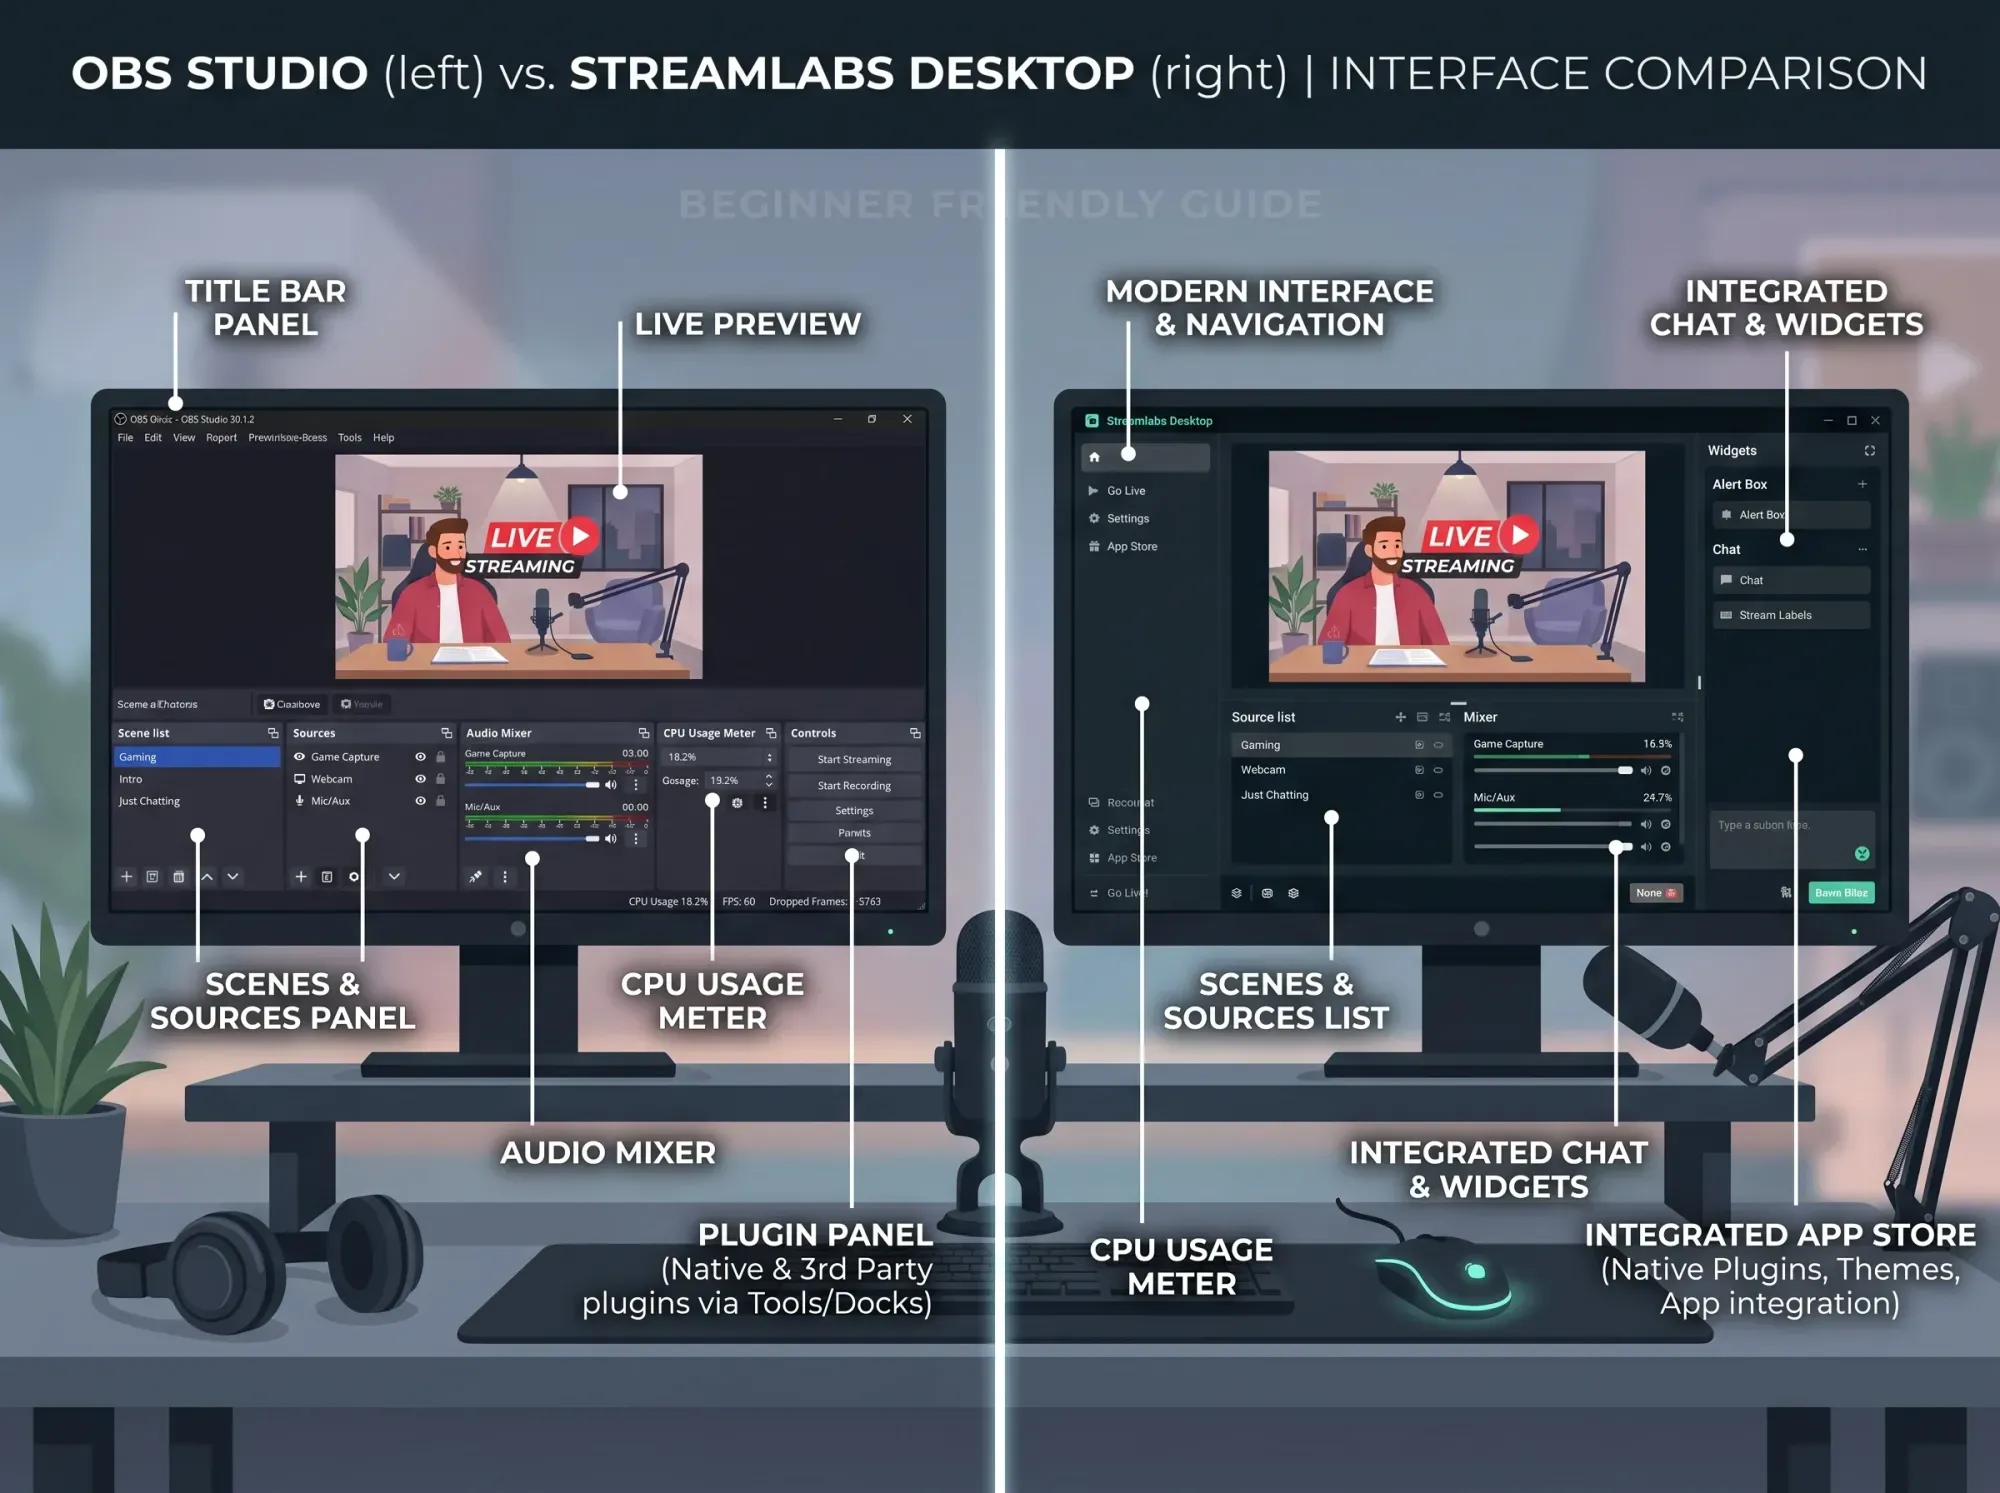
OBS Studio vs. Streamlabs Desktop: Which Should You Choose?
Many new streamers are confused by the difference between OBS Studio and Streamlabs Desktop. Here is a quick breakdown to help you decide which tool fits your workflow.
| Feature | OBS Studio | Streamlabs Desktop |
|---|---|---|
| Performance | Lightweight, uses minimal CPU | Heavier resource usage |
| Ease of Use | Steeper learning curve | Beginner-friendly with built-in themes |
| Cost | 100% Free | Free base, paid premium features |
| Plugins | Massive library of custom plugins | Limited to official integrations |
Troubleshooting Common Issues
Even with a perfect setup, things can occasionally go wrong. Here are the most common fixes:
- Black screen on game capture: Application conflicts (overlays, anti-virus) or missing administrator privileges are common causes. If Game Capture shows a black screen, try running OBS as an administrator, or switch to a Display Capture source instead (OBS Knowledge Base, 2026).
- Audio desync: If your microphone audio doesn't match your webcam video, click the gear icon in the Audio Mixer, select Advanced Audio Properties, and add a Sync Offset (usually between 50-200ms) to your microphone.
- Dropped frames: Dropped frames mean your internet connection can't keep up with your bitrate. Lower your video bitrate in the Output settings, or switch from a wireless to a wired Ethernet connection.
Frequently Asked Questions
Is OBS Studio completely free?
What is the difference between OBS Studio and Streamlabs OBS?
Can I record and stream at the same time in OBS?
What is Studio Mode in OBS?
Is OBS Studio safe to download?
Why does my OBS stream look blurry?
Does OBS work on Mac?
Can I use OBS with Zoom?
Does OBS have a time limit for recording?
Taking Your Videos Beyond the Stream
Learning how to use OBS Studio gives you complete control over your video production, whether you are broadcasting live to Twitch or recording a polished webinar for your business.
The real value of OBS for marketing comes after the recording stops. Once you have a high-quality video file, uploading it to YouTube and embedding that on your website introduces distractions and competitor ads. To maximize your conversions and keep viewers on your site, you need a professional, distraction-free video player.